INTRODUCTION: In this experiment you will use the principles of conservation of momentum and energy to determine the speed of a horizontally projected ball and use this speed to predict the distance the ball will travel before striking the ground, along with an estimate of the error in your prediction. You will then measure the distance the ball actually travels, determine the error in your measurement, and compare the predicted and experimental ranges to see if they agree. Finally you use a computer simulation to study the effect of air resistance on the trajectory of a horizontally projected ball
EXPERIMENT: Measuring the Projectile Speed --
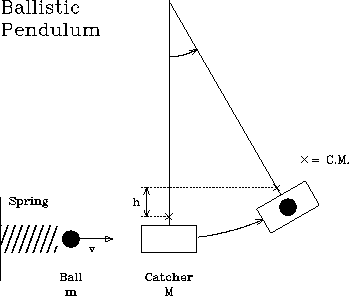
Consider a steel ball of mass ![]() that is fired from a spring-loaded
gun into a catcher-swing of mass
that is fired from a spring-loaded
gun into a catcher-swing of mass ![]() . The ball has an initial velocity
of
. The ball has an initial velocity
of ![]() . The catcher is initially at rest and is free to swing like a
pendulum. After capturing the ball, the catcher + ball have a
velocity
. The catcher is initially at rest and is free to swing like a
pendulum. After capturing the ball, the catcher + ball have a
velocity ![]() . At the moment the ball is captured there is no net
external force acting on the catcher + ball system. Thus, its linear
momentum is constant, and from the law of conservation of momentum:
. At the moment the ball is captured there is no net
external force acting on the catcher + ball system. Thus, its linear
momentum is constant, and from the law of conservation of momentum:
 |
(1) |
The ball's velocity ![]() can be computed if we can measure
can be computed if we can measure ![]() , which
should be easier since it is much slower (
, which
should be easier since it is much slower (![]() ). Note that kinetic
energy is not conserved in this collision because of the dissipating
force of friction which locks the ball into the catcher.
). Note that kinetic
energy is not conserved in this collision because of the dissipating
force of friction which locks the ball into the catcher.
After the ball is caught in the catcher and the swing-arm starts to
move, momentum is no longer conserved because there is a net external
force (the force of the swing-arm and gravity are no longer
parallel). However, once the catcher-swing starts in motion,
conservation of mechanical (kinetic plus potential) energy applies
because the force of the swing-arm is always perpendicular to the
motion of the catcher. As shown in Figure 1, the catcher with the
ball continues to swing upwards until it stops with its
center of mass at a vertical distance, ![]() , above the
starting level. The kinetic energy of the catcher plus ball,
, above the
starting level. The kinetic energy of the catcher plus ball,
![]() , has become gravitational potential energy,
, has become gravitational potential energy, ![]() .
.
From conservation of energy:
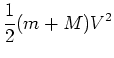 |
|||
 |
(2) | ||
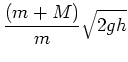 |
(3) |
where eqn. (3) comes from combining eqns. (1) and (2).
A ratchet arrangement keeps the pendulum from falling back after it
reaches its highest point and ![]() is easily measured. [We assume that
no energy is lost by drag of the ratchet latch as the catcher swings
upward.] Thus the ball's initial velocity can be computed from easily
measured quantities.
is easily measured. [We assume that
no energy is lost by drag of the ratchet latch as the catcher swings
upward.] Thus the ball's initial velocity can be computed from easily
measured quantities.
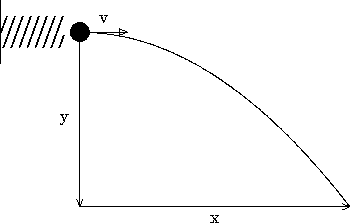
Calculation of the Range of the Projectile: We will now move the
ballistic pendulum out of the way and fire the ball horizontally from
an initial elevation ![]() and see whether the ball hits the floor at
the predicted horizontal distance
and see whether the ball hits the floor at
the predicted horizontal distance ![]() . See Figure 2.
. See Figure 2.
The horizontal component of the velocity is constant and equal to the initial
speed ![]() of the bullet so that
of the bullet so that
| (4) |
where ![]() is the time of flight of the bullet. Along the vertical,
the bullet falls from rest with constant downward acceleration
is the time of flight of the bullet. Along the vertical,
the bullet falls from rest with constant downward acceleration ![]() so
that
so
that
| (5) |
Eliminating ![]() between eqns. (4) and (5) gives
between eqns. (4) and (5) gives
| (6) |
Finally, combining eqns. (3) and (6) gives the location ![]() at which
the ball should hit the floor as predicted from a single pendulum
measurement,
at which
the ball should hit the floor as predicted from a single pendulum
measurement,
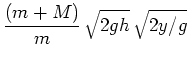 |
|||
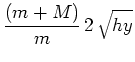 |
(7) |
Note that ![]() cancels out. [Here is an important lesson: An analysis
should becarried to the end using only symbols and mathematics. Don't
use numerical quantities until you have to!] In order to make a
prediction of the range
cancels out. [Here is an important lesson: An analysis
should becarried to the end using only symbols and mathematics. Don't
use numerical quantities until you have to!] In order to make a
prediction of the range ![]() , you will measure
, you will measure ![]() a number of times
and use the average value,
a number of times
and use the average value, ![]() , in eqn. (7). You will then
measure
, in eqn. (7). You will then
measure ![]() a number of times and compare the average,
a number of times and compare the average, ![]() ,
with the value of
,
with the value of ![]() from eqn. (7).
from eqn. (7).
UNCERTAINTIES: You should read and understand
sections 2.8 and 2.9 in Baird. In using eqn. (7) to predict where the
projectile hits the floor we must take into account the errors in our
measurements of the quantities we plug into the equation -- ![]() ,
, ![]() ,
,
![]() , and
, and ![]() . We will ignore the errors in measuring
. We will ignore the errors in measuring ![]() and
and ![]() since they are small. To get
since they are small. To get ![]() , the error in
, the error in ![]() , you will
simply estimate how accurate our measurement is -- probably within
the order ofa mm. To get
, you will
simply estimate how accurate our measurement is -- probably within
the order ofa mm. To get ![]() , the error in
, the error in ![]() , you will
repeat the measurement a number of times and calculate the standard
deviation,
, you will
repeat the measurement a number of times and calculate the standard
deviation, ![]() . Then
. Then
![]() . But we must now
combine
. But we must now
combine ![]() and
and ![]() to determine
to determine ![]() . To do this
we use the relation, that if
. To do this
we use the relation, that if ![]() is a function
is a function ![]() of
of ![]() and
and ![]() ,
,
Then
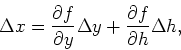
where
![]() is the partial derivative of
is the partial derivative of ![]() with respect to
with respect to ![]() . All that is meant by the term partial derivative
with respect to
. All that is meant by the term partial derivative
with respect to ![]() is that you ignore that
is that you ignore that ![]() is a variable and just
take the regular derivative
is a variable and just
take the regular derivative ![]() (and similarly for
(and similarly for
![]() ). Then from eqn. (7) we see
). Then from eqn. (7) we see
and
![\begin{displaymath}\Delta x = \frac{(m+M)}{m}\left[ \sqrt{\frac{h}{y}}\, \Delta y +
\sqrt{\frac{y}{h}}\, \Delta h\right].\end{displaymath}](img49.gif)
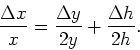
Dividing both sides of this equation by eqn. (7), we find the simple result:
 |
(8) |
Thus, we predict the projectile will land at range values of ![]() and
and ![]() , where
, where ![]() is given by eqn. (7) and
is given by eqn. (7) and
![]() is given by eqn. (8).
is given by eqn. (8).
SIMULATION: For the last part of this laboratory you will use a commercial software package, Interactive Physics, to study the trajectory of a horizontally projected ball with and without air friction. One question you will be examining, among others, is ``What conservation laws apply during the flight of the ball and how does this change when you include air resistance?''. The tutorial (see below) tells you how to use Interactive Physics to produce the simulation
PROCEDURE:
Part A
When cocking the spring plunger, push straight back so as not to bend
the rod. Careful: there are several catches on the plunger: always
use the same catch. Shoot the ball into the catcher and measure the
vertical rise ![]() (measure to mark on catcher arm showing center of
mass of combined system of catcher + ball). Repeat at least five
times. The numbers on the ratchet are only for reference. Calculate
(measure to mark on catcher arm showing center of
mass of combined system of catcher + ball). Repeat at least five
times. The numbers on the ratchet are only for reference. Calculate
![]() , the average of your measurements, and the standard
deviation,
, the average of your measurements, and the standard
deviation, ![]() .
.
Measure the mass, ![]() , of the ball with a balance to within 0.1 gm.
The mass (
, of the ball with a balance to within 0.1 gm.
The mass (![]() ) of the catcher, is given to you on the body of
apparatus. Aim the mechanism toward the wall which should have a
protective sheet to absorb the impact of the bouncing ball. BE
CAREFUL OF YOURSELF AND OTHERS; DON'T PLAY GAMES WITH THE APPARATUS!
DO NOT COCK THE GUN UNTIL YOU ARE READY TO FIRE! Measure with the
meter stick the vertical distance
) of the catcher, is given to you on the body of
apparatus. Aim the mechanism toward the wall which should have a
protective sheet to absorb the impact of the bouncing ball. BE
CAREFUL OF YOURSELF AND OTHERS; DON'T PLAY GAMES WITH THE APPARATUS!
DO NOT COCK THE GUN UNTIL YOU ARE READY TO FIRE! Measure with the
meter stick the vertical distance ![]() through which the ball will fall
while in flight.
through which the ball will fall
while in flight.
Part B Tape a large sheet of paper to the floor to where a test shot landed. In some cases a piece of carbon paper can be placed on the sheet to give a better imprint; often this is unnecessary and will slow you down. You will compare the predicted (theoretical) values with your what you measure in the experiment.
SAFETY WARNING: Treat the spring-loaded gun with great caution. Load or cock the mechanism only just prior to firing. No one should ever be in front of a loaded gun. Warn others when you are ready to make a shot. Watch your fingers!
For this part of this laboratory you will use a commercial software package, Interactive Physics, to study the trajectory of a horizontally projected ball with and without air friction. With Interactive Physics it is very easy to develop your own simulation. The tutorial below will show you how to do this. If you have trouble or run out of time, you can alternatively use the simulation already written and stored on your computer with filename: Horizontal ball. Note, however, you will have to modify this simulation to include air resistance.
1. Double click on the Interactive Physics (IP) icon, or if IP is already open select New under the File menu.
2. The first step will be to add a ball (circle) to your simulation. To do this select the circle from the toolbar on the left-hand side of IP. Move your mouse to the upper left hand side of the page and click on the mouse and holding the button down move the pointer (this is called click and drag) until a circle about 1 cm in diameter appears.
3. The next step will be to locate the circle at y = 0 so that initial gravitational potential energy is zero. Click again anywhere inside the circle and four small squares will appear surrounding the sphere. This means you have selected the circle and any subsequent action you take will refer to the circle. If you click and drag on the circle you can move it where ever you want on the page. Alternatively, click twice on the circle and a box will pop up that allows to change any of the properties of the sphere. Type 0.0 into the box for the y-coordinate.
4. We now want to set the initial velocity to about 5 m/s horizontal. You can again double click on the circle and type 5.0 into the box for Vx. Alternatively click and drag on the center of the circle. A vector labeled V will appear, which you should drag until it is about 3 cm long and horizontal. The other properties are not important, so just leave them at the default values.
5. You can test your simulation at any point by clicking on the run button, which then changes over to a stop sign to allow you to stop the simulation. You will need to click on reset and on the circle again before you make any further changes to the simulation.
6. Next we want to define which vectors we want to show up on the simulation. To do this select the circle, pull down the Define menu, choose Vectors, and one at a time check Velocity, Acceleration, and Gravitational force. If you now run the simulation these vectors will appear. If the length of any of the vectors is too long or too short, you can change it (without affected the trajectory) by again pulling down the Define menu, picking Vector length, and moving the slide in the appropriate direction.
7. As things are set up now it's difficult to follow your trajectory. To ``plot'' your trajectory, pull down the World menu and choose Every 16 frames under Tracking. Reset, then run your simulation again. Stop the simulation when the circle moves off screen. Notice the slide bar at the bottom of the screen. Use it to run back through your simulation. Notice that you can advance one frame at a time.
8. The next step is to measure some of the properties of the ball as it moves along the trajectory. Click on the circle, then pull down the Measure menu and select momentum, translational kinetic energy, and gravitational potential energy. This will produce boxes on your screen. Click on each box in turn and select graph. Click and drag on the lower right hand corner of each box to increase the size of the graph. Now repeat these steps to produce three more boxes, but leave them in digital form. Move the boxes around on the screen so they don't interfere with the trajectory (i.e., cover it up).
9. Run your simulation and answer the questions on the data sheet. Caution! Do not run the simulation for more than two (graph) seconds or the graphs will rescale to an inconvenient scale, which will take a little work to undo.
10. Finally add air resistance by pulling down the World
menu and choosing Air Resistance. Click on Standard and set
the value of ![]() to 0.25. This setting assumes the air resistance is
proportional to the speed of the object. Add the vector Air Force
to your simulation.
to 0.25. This setting assumes the air resistance is
proportional to the speed of the object. Add the vector Air Force
to your simulation.
11. Set the ball mass, radius, height, and initial velocity to the same
values you found using the ballistic pendulum. Determine how far the ball
goes with and without air resistance. Run your simulation and answer the
questions on the data sheet. Explore the effect of changing ![]() . You may
want to try High setting which assumes the air resistance is
proportional to the speed squared.
. You may
want to try High setting which assumes the air resistance is
proportional to the speed squared.
All responses should be typed and in complete sentences.
A. Trajectory without air friction
B. Trajectory with air friction