Start->ControlPanel->AdministrativeTools->LocalSecurityPolicy->LocalPolicies->SecurityOptions
that the "Microsoft network client: Send unencrypted password to third party SMB servers" is "Enabled". If not, double-click on it and set to "Enabled". Than reboot the PC.
On some systems "LocalSecurityPolicy" as noted above will be missing either due to the customization by manufacturer or due to the Windows OS version. In such case, please download xp.reg file and double click on it toexecute it. Reboot. Same result as the procedure above.
Having done the step above (needed to be done only once) you can mount the backup drive by doing:
MyComputer->Tools->Mapnetworkdrive
There, enter drive letter of your choice and folder:
\\carpathia.physics.rutgers.edu\username
(where the "username" is your username). If planning automatic backups, please check "Reconnect at the login" box. If the username you use on your own PC is different from the one on the Sun system, click "Connect using a different username" as well. You'll be asked for username and password. If you have firewall of any kind allow Samba network drive mounting through it (depends on the firewall you have).
Connection should go through and you should have your account space on carpathia mounted as a network drive at the chosen network drive name. Now you are ready for performing backups.
On Windows XP systems we recommend built-in Windows backup program. Depending on the OS installation you may already have this utility or you may need to add it from the Windows XP installation CD. To check for its existance do:
Start->Programs->Accessories->SystemTools
and see if the "Backup" program exists there. If it does, you are ready to use it. If it does not appear there, please do following to install it (you will need Windows XP installation CD for this):
Insert your Windows XP CD into the drive and, if necessary, double-click the CD icon in My Computer. On the Welcome to Microsoft Windows XP screen, click Perform Additional Tasks. Click Browse this CD. In Windows Explorer, double-click the ValueAdd folder, then Msft, and then Ntbackup. Double-click Ntbackup.msi to install the Backup utility. When done you'll find backup utility at the location mentioned above.
To perform backup or set it up in automatic mode do:
Start->Programs->Accessories->SystemTools->Backup
This will start backup wizard.
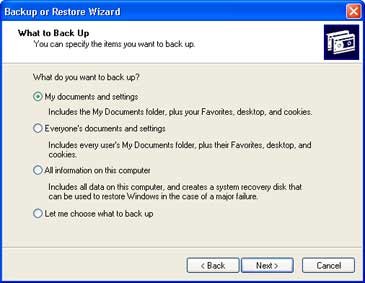
Click Next to skip past the opening page, choose Back up files and settings from the second page, and then click Next. You should see the page shown in Figure 1, which represents your first decision point.
You might be tempted to click All information on this computer so that you can back up every bit of data on your computer. Think twice before choosing this option, however. If you've installed a slew of software, your backup could add up to many gigabytes. For most people, the My documents and settings option is a better choice. This selection preserves your data files (including e-mail messages and address books) and the personal settings stored in the Windows Registry.
If you know that you have data files stored outside your profile, click Let me choose what to back up. This option takes you to the Items to Back Up page shown in Figure 2.
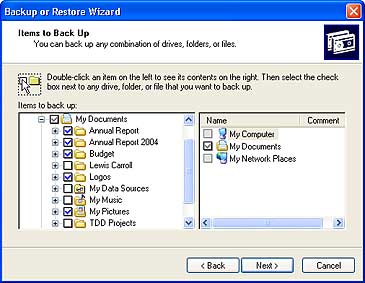
Select the My Documents check box to back up all the files in your personal profile, and then browse the My Computer hierarchy to select the additional files you need to back up. If some of your files are on a shared network drive, open the My Network Places folder and select those folders. This option also comes in handy if you have some files you now you don't want to back up.
On the Backup Type, Destination, and Name page, Windows asks you to specify a backup location. Backup assumes you're going to save everything in a single file; you just have to choose a location for that file and give it a name. Click Browse and choose the location: network drive you have mounted from carpathia.physics.rutgers.edu. If you have forgotten its name, use MyComputer to see it.
After you've chosen a backup location, enter a descriptive name of your choice for the file, click Next to display the wizard's final page, as shown in Figure 3, and then click Finish to begin backing up immediately.
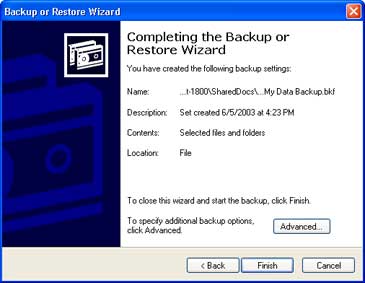
If you are backuping the laptop not permanently located at the Department, you can repeat the above steps once each week (or time interval of your choice) and perform regular backups when you're ready. If you'd rather not count on remembering to perform this crucial task and you are backuping personal workstation permanently located at the Department - set up an automatic backup schedule for Windows. When you get to the final page of the Backup Wizard (see Figure 3 above), don't click Finish. Instead, click the Advanced button, and click Next to open the When to Back Up page. Choose Later, and then click Set Schedule to open the Schedule Job dialog box shown in Figure 4.
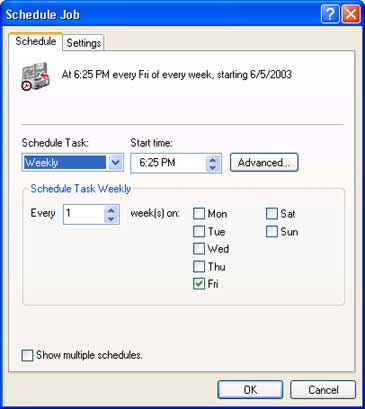
This example shows the settings for a weekly backup on Friday afternoona good way to make sure your week's work is protected. But you can set almost any schedule you want. After you click OK to save your changes, Windows XP runs the backup automatically. Just remember to leave your computer turned on (and not set to go into the suspended mode). The Backup utility can safely create a copy of any file, even if it's currently in use. For more information, see the Microsoft TechNet article.